
Are you craving a dessert that’s as beautiful as it is delicious? Enter the Torta Mimosa—a classic Italian cake that’s perfect for celebrations, special occasions, or just a sweet craving. If you’ve ever tried to make it and thought, “How do I get that perfect sponge, filling, and decoration?” you’re in the right place. Today, I’ll walk you through everything you need to know—step-by-step, detailed, and filled with expert tips—to make your Torta Mimosa unforgettable.
What Is a Torta Mimosa?
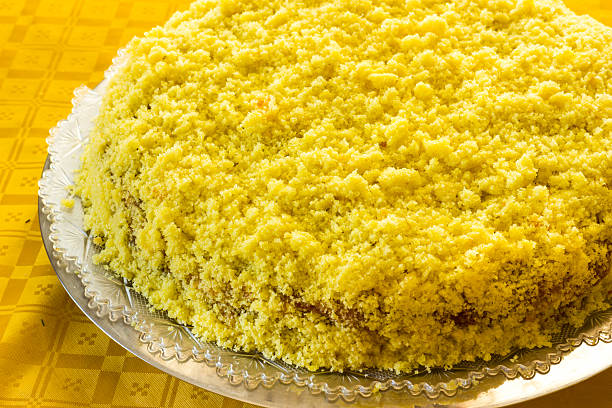
Let’s start with the basics. Torta Mimosa is a traditional Italian layered cake that pays homage to the mimosa flower—bright, cheerful, and full of sunshine. It’s characterized by:
- A soft, airy sponge cake.
- Rich pastry cream filling.
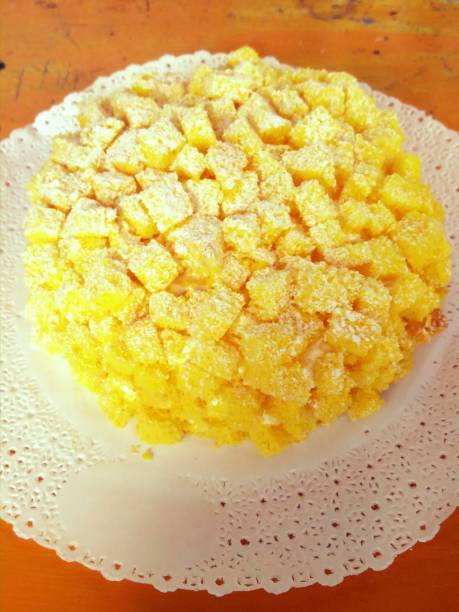
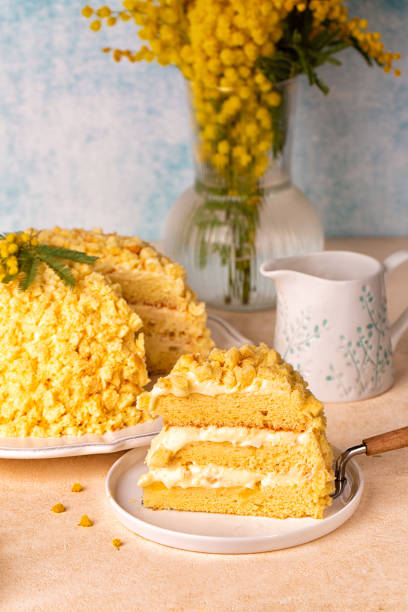
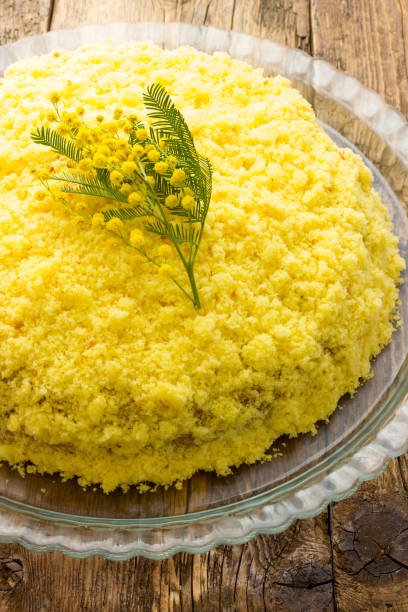
- A distinctive topping made of crushed savoiardi (ladyfingers) or sponge cake pieces, resembling mimosa blossoms.
- Often decorated with additional pastry cream or meringue.
This cake is popular in Italy, especially around International Women’s Day, celebrated March 8th, because of its vibrant yellow color and festive appearance.
Why Choose Torta Mimosa?
Apart from its stunning look, Torta Mimosa offers a wonderful balance of flavors. The light sponge contrasts beautifully with the creamy filling, while the crunchy topping adds texture. It’s relatively simple to prepare but looks fancy enough to impress guests. Plus, its versatility allows for creative variations—think different fillings or toppings!
Now, let’s delve into the details of making this delicious cake a reality in your kitchen.
Materials Needed for Torta Mimosa
Here’s a detailed breakdown of what you’ll need to craft an authentic Torta Mimosa.
| Ingredient | Quantity | Notes |
|---|---|---|
| Eggs | 4 large | Fresh, at room temperature |
| Granulated sugar | ¾ cup (150g) | For sponge and filling |
| All-purpose flour | 1 cup (120g) | Sifted for a fluffy sponge |
| Baking powder | 1 teaspoon | Optional, for extra rise |
| Whole milk | ½ cup (120ml) | For pastry cream |
| Cornstarch (or potato starch) | 3 tablespoons | Thickening pastry cream |
| Unsalted butter | 2 tablespoons | Adds richness to the pastry cream |
| Vanilla extract | 1 teaspoon | For flavor in the pastry cream |
| Heavy cream | 1 cup (240ml) | For optional whipped topping |
| Powdered sugar | 2-3 tablespoons | To sweeten whipped cream |
| Ladyfingers (Savoiardi) | About 20 pieces | Used for topping and filling |
| Lemon zest (optional) | 1 teaspoon | Adds freshness to pastry cream |
Additional Tools
- Mixing bowls
- Electric mixer or whisk
- Sponge cake pan (around 8 inches)
- Baking parchment paper
- Cooling rack
- Pastry bag with tip (for filling)
- Sharp knife
How to Make the Perfect Torta Mimosa
Let’s walk through each step carefully. The key to success is paying attention to detail and gently handling each component.
1. Preparing the Sponge Cake
Why it’s crucial: A light, fluffy sponge is the foundation of your cake. No one likes a dense, heavy layer.
Steps:
- Preheat your oven to 350°F (180°C). Line your cake pan with parchment paper.
- Separate the eggs, placing yolks and whites in different bowls.
- Beat egg whites until soft peaks form. Gradually add half of the sugar and beat until stiff, glossy peaks appear.
- In the separate bowl, whisk yolks with remaining sugar until pale and creamy.
- Carefully fold the yolk mixture into the whites using a spatula, maintaining airiness.
- Sift flour (and baking powder if using) over the batter, gently folding in until just combined.
- Pour batter into the pan and bake for 25–30 minutes or until a toothpick inserted comes out clean.
- Let the sponge cool completely on a wire rack.
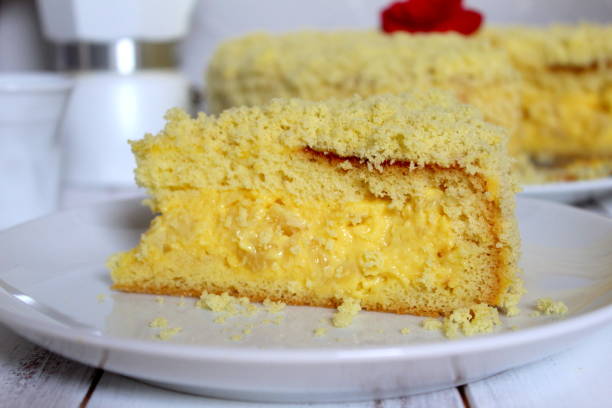
2. Making the Pastry Cream
Key tip: A smooth, thick pastry cream is essential for flavor and structure.
Steps:
- Heat milk until just boiling, then remove from heat.
- While milk heats, whisk together eggs, sugar, and cornstarch until smooth.
- Slowly pour hot milk into the egg mixture, whisking constantly to prevent curdling.
- Return everything to the saucepan and cook over medium heat, whisking continuously until thickened.
- Remove from heat, stir in butter and vanilla, and let it cool. Cover with plastic wrap pressed directly onto the surface to prevent a skin from forming.
3. Assembling the Cake
Digital tip: Consistency is key here.
- Slice the cooled sponge horizontally into two layers.
- Spread a generous layer of pastry cream on the bottom layer.
- Place the top layer back, pressing gently.
- Chill for 30 minutes to set.
4. Creating the Mimosa Topping and Decoration
The signature look: Crushed ladyfingers resemble mimosa blossoms.
Steps:
- Crush the ladyfingers into coarse crumbs.
- Gently press the crumbs onto the sides and top of the chilled cake.
- For an extra touch, whip heavy cream with powdered sugar and pipe or spread on top.
- Decorate with additional pastry cream, edible flowers, or mimosa flowers if available.
Tips for Success
- Use fresh ingredients: Especially eggs and dairy—they make a difference.
- Don’t overmix the sponge: Gently fold ingredients to keep the cake airy.
- Cool the sponge completely: To prevent cracking when filling and decorating.
- Chill before decorating: This helps retain shape and makes applying toppings easier.
- Use quality ladyfingers: Stale or soft ladyfingers will ruin the texture.
- Reserve some pastry cream: For decorative piping or final touches.
Common Mistakes & How to Avoid Them
| Mistake | Solution |
|---|---|
| Overmixing the sponge batter | Gently fold ingredients to keep the batter airy. |
| Not sifting flour | Sift to prevent lumps and promote a light texture. |
| Filling the cake too early | Chill to let the layers set before decorating. |
| Using stale ladyfingers | Buy fresh or store properly to maintain crunch. |
| Ignoring the pastry cream’s consistency | Cook until thick enough to hold its shape. |
Variations to Personalize Your Torta Mimosa
- Fillings: Replace traditional pastry cream with ricotta, mascarpone, or whipped cream for a lighter or richer flavor.
- Flavor Boosters: Add lemon zest, orange zest, or a splash of liqueur (like Limoncello) to the pastry cream.
- Decor: Top with fresh fruit, edible flowers, or a drizzle of honey.
- Gluten-Free Version: Use almond flour or gluten-free flour blends in the sponge.
Final Thoughts
Creating a stunning Torta Mimosa isn’t just about the ingredients; it’s about the love and care you pour into each step. With patience, attention to detail, and a little practice, you’ll be able to craft a bakery-quality cake at home. Whether for a special celebration or just because you deserve a sweet treat, this cake will surely impress friends and family.
So grab your ingredients, follow these steps, and enjoy the process of making your very own Torta Mimosa. After all, the joy of baking lies in sharing something beautiful and delicious with the ones you love!
Remember: Practice makes perfect. Don’t be discouraged if it’s not perfect on your first try. Happy baking!


